The Spanners demo project is now available on GitHub: https://github.com/hotblac/spanners. Feel free to fork!
I wanted to migrate the Spanners demo from SVN to Git, partly so I could take advantage of GitHub to host it (yes, I know I could host a SVN project on GitHub but where’s the fun in that?). I also wanted to start using a Distributed Source Control Management (DSCM) system and Git is certainly the most popular of these. Even though I’m (currently) the sole contributor to the Spanners demo project, it’s useful to understand how a DSCM system differs from a ‘traditional’ centralized server based SCM such as SVN and CVS.
My aim was to migrate my existing project from SVN – revision history and all – to Git. I also wanted to keep the Maven automated release functionality described in the Maven Release Plugin post.
I currently develop on a Windows environment. Git works perfectly well on Windows but it very much feels like Linux is preferred. This post documents the steps to migrate from SVN, specifically in a Windows environment.
Install Git
A Git package is available for download here. Packages for various environments are available and the page detects your system and helpfully directs you to the right one. It will direct Windows users to the mySysGit project which provides a Windows exe installer package. Running the exe gives you a local Git environment, installs a basic Windows GUI and adds some items to the right-click context menu in the File Explorer.
I also downloaded TortoiseGit because I like the TortoiseSVN style interface. If you’re happy running Git from command line or through an IDE, this is not necessary.
Setup Git
Chapter 1 of Pro Git describes the necessary first time setup. Instructions are given as bash commands. For Windows users, a Unix style shell is installed with mySysGit – accessible by right clicking on the Windows Explorer and clicking Git Bash.
$ git config --global user.name "John Doe"
$ git config --global user.email [email protected]
As a minimum, set the user name and email:
Install SVN migration tools
The standard Git installation does not support SVN integration or conversion out of the box so a tool is required to convert. I used one of the many tools called (obviously) svn2git as recommended by GitHub. This is packaged as a RubyGem so Ruby will have to be installed if it’s not already.
- Download and install Ruby. The RubyInstaller is the easiest way to do this in Windows. One gotcha though: Don’t install to Program Files directory as this installer doesn’t like directories with spaces.
- Download and install RubyGems. Download the latest zip from RubyForge and extract it. Open a command prompt in the extracted directory and run:
ruby setup.rb
- Use RubyGems to install svn2git by running:
gem install svn2git
Map SVN users to Git users
Every commit in Subversion’s history is associated with a user in the Subversion server. These users will have to be mapped to Git user details. This mapping can be provided to the svn2git tool in a text file.
Every user with any history in Subversion must be included in this mapping. I thought I had only one user committing but I forgot about the default server user (called VisualSVN Server) and a buildengine user used by Maven. To discover all users with history, you can grep the SVN history log by running this command from the handy bash shell that comes with Git:
svn log --quiet http://path/to/root/of/project | grep -E "r[0-9]+ \| .+ \|" | awk '{print $3}' | sort | uniq
Create a file called authormap.txt and add a line for each user like this:
svnuser=gitusername<gituseremail>
Here’s an example authormap.txt file.
Convert to Git
Finally, all the pieces are in place to run the conversion. Run svn2git from the (Windows) command line like this:
svn2git http://path/to/root/of/project --username stevie --authors c:\authormap.txt -v
The –username here is the user used to connect to the SVN repo. svn2git will require a password too. It should prompt for this but I found the prompt was never shown – a known issue. If it appears to hang after showing a message about the Authentication Realm, try entering the SVN password.
Once it connects – and assuming that the authormap.txt is good – it will churn through the entire SVN history and build up a Git repo. I found it took a few minutes for my toy Spanners project so it could take several hours for a real project. Once it’s finished, you’ll have a local Git repo.
Create GitHub account
https://github.com/. Simply register and create a new repo. Couldn’t be easier!
Push!
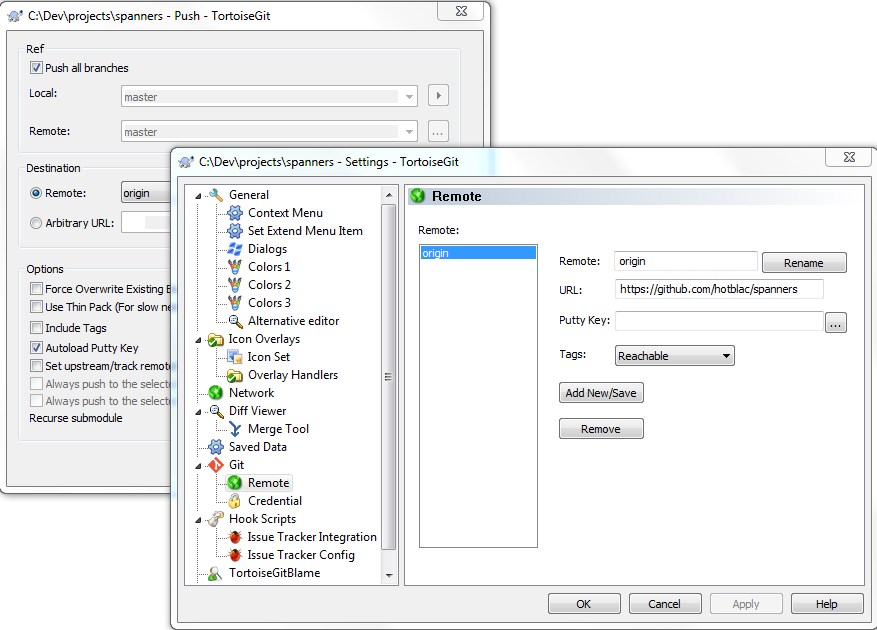
The local Git repo can now be pushed to the GitHub repo. I used TortoiseGit for this. It has a nice UI for managing remote repos.
Cache Username / Password
To save having to type in the GitHub account password on every push or fetch, a password helper can be installed to store it locally. This is particularly useful to support automated Git operations, such as the Maven release mechanism.
I used the git-credential-winstore program which is mentioned in the Set Up Git guide. After this was installed, it prompted for a password the next time I contacted the remote repo. After that, it automatically logged in as required.
Maven Integration
Setting up Maven to talk to the remote repo was straightforward. I simply updated the SCM section in my project pom with connection details for my remote GitHub repo:
<scm>
    <connection>scm:git:https://github.com/hotblac/spanners.git</connection>
    <developerConnection>scm:git:https://github.com/hotblac/spanners.git</developerConnection>
</scm>
After this was committed, I could run a Maven release as before. It would bump the project version number, create a release tag and push both to the remote repo.
References
- Pro Git. An excellent introduction to Git. The first two chapters are required reading for first time users.
- Set Up Git. Very quick guide to setting up.
- Omranic: Convert SVN to Git. Detailed instructions on using svn2git and SubGit.
Probably the first time I see the tutorial that describes how to migrate using tool written in Rubby. Looks definitely simple and well automated. Let me share my SVN to Git migration story SVN to Git migration that works
Thank you very much for the detailed description. I have tryied the described steps, however, the ‘convert to git’ gives me an error:
——————————————————————————————
Running command: git config –local svn.authorsfile C:authormap.txt
Running command: git svn fetch
Running command: git branch -l –no-color
Running command: git branch -r –no-color
Running command: git config –local –get user.name
Running command: git config –local –get user.email
Running command: git checkout -f master
error: pathspec ‘master’ did not match any file(s) known to git.
command failed:
2>&1 git checkout -f master
——————————————————————————————–
I would be very thankful for any advice on how to fix this.
I’ve seen the same error that Baba had recently. In my case it was caused by a non-standard SVN repo layout where the trunk and branches of my project were several directories down. I saw the error when I tried `svn2git http://myrepo/root/a/b/trunk`. I fixed it by running svn2git on the root of the repo and then specifying the trunk location with a command like `svn2git http://myrepo/root –trunk a/b/trunk –branches a/b/branches`.
The comments on a issue 41 on the svn2git tool helped point me in the right direction.